Locking and Unlocking the Device
You can lock the device so that it stops processing calls. This may be useful, for example, when you want to upload new software files to the device and you don't want any traffic to interfere with the process. Locking the device may be done gracefully, whereby the device stops accepting new calls, but allows existing calls to continue for up to a user-defined duration before terminating them.
You can also configure the device to wait without a timeout until all active calls end on their own, before going into lock state. This is done through the CLI, using the following command: # admin state lock graceful forever
|
1.
|
Open the Maintenance Actions page: |
|
●
|
Toolbar: Click the Restart button. |
|
●
|
Navigation tree: Setup menu > Administration tab > Maintenance folder > Maintenance Actions. |

|
2.
|
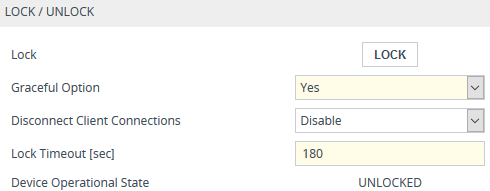
From the 'Graceful Option' drop-down list, select one of the following options: |
|
●
|
Yes: The device locks only after a user-defined duration, configured in the 'Lock Timeout' field (see next step). During this interval, no new traffic is accepted, allowing only existing calls to continue until the timeout expires. If at any time during this timeout there are no active calls, the device locks. If there are still active calls when the timeout expires, the device terminates them and locks. |
|
●
|
No: The device locks immediately, terminating all existing traffic. |
Note: These options are available only if the current status of the device is in "UNLOCKED" state.
|
3.
|
If you configured 'Graceful Option' to Yes (see previous step), then in the 'Lock Timeout' field, enter the time (in seconds) after which the device locks. |
|
4.
|
If you also want the device to terminate (close) existing TLS/TCP client connections and reject new incoming TLS/TCP client connections during the locked state, then from the 'Disconnect Client Connections' drop-down list, select Enable. If disabled (default), existing client connections will remain and incoming TLS/TCP client connections will be accepted during the locked state. |
|
5.
|
Click the LOCK button; a confirmation message box appears requesting you to confirm device lock. |
|
●
|
If you configured 'Graceful Option' to Yes, the Maintenance Actions page displays the number of remaining calls (if any) and remaining time. To cancel the lock, click Cancel Graceful Lock. |

|
●
|
If you configured 'Graceful Option' to No, the lock process begins immediately. |
The 'Device Operational State' read-only field displays "LOCKED" and the device doesn't process any calls:

|
■
|
Click the UNLOCK button; the device unlocks immediately and accepts new incoming calls. The 'Device Operational State' read-only field displays "UNLOCKED". |


